Monday, May 28, 2012

"The Harvest" - TV Dinner Cupcakes

When I first started getting into making cupcakes, I was at the bookstore and saw the book, "Hello, Cupcake".  I immediately needed to have it and my husband was nice enough to buy it for me.  These are the first cupcakes I made from the book and they are probably still my favorites.  I just love them!


Buy this book!
Since I didn't do anything different from the book, I will just tell you to go get it!  You should have it in your kitchen, anyway! 

I have to tell you, these are SO EASY to make.  And super fun. 

Words of wisdom:  If you can, get chewable runts for the peas.  That was a suggestion given to me by the person that chose to eat the peas and carrots cupcake.  :)

Be Crafty,

Kris

Favorite quote from this Buffy Episode:
Giles: For as long as there have been vampires, there has been the Slayer. One girl in all the world, a Chosen One...
Buffy: He loves doing this part.
Giles: Alright. The Slayer hunts vampires, Buffy is a Slayer, don't tell anyone. Well, I think that's all the vampire information you need.

Sunday, May 27, 2012

"No Place Like Home" - Wizard of Oz cake

Hey strangers! 
Sorry it's been so long since a new post.  Christmas and things since have been quite busy.  Also, my laptop seems to be on the fritz so it's difficult to write.  Okay, enough excuses.  On to the cake!


This was actually my first cake that I made with creative decorating.  It was a going away cake for my friend that was moving away from Kansas.

Ingredients:
9x13 cake pan
1 box yellow cake mix
1 can Frosting - dyed green
1 tube yellow icing
1 tube red icing
1 tube green icing
Yellow sugar
Dorothy figurine


Make cake as directed.  Frost cake with green tinted frosting all over.  Using yellow icing and a round tip, draw out the yellow brick road across the cake.  I even did the bricks.  I also used this to write on the cake.  Then fill in the road with the yellow sugar.  Using the green icing and a grass tip to make grass along the edge of the cake and the edge of the brick road.  Using the red icing and the star tip to make the red poppies.  Lastly, place the Dorothy figure on the road.


Trial and error:  Since this was my first attempt to tint frosting, I couldn't get it any greener than that.  I thought for the most part, everything turned out pretty well for my first time!

Be Crafty,

Kris

Favorite quote from this Buffy episode:
Buffy: What are you doing here?
Spike: Look... Buffy: Five words or less. Spike: [counts on his fingers] Out for a walk. [pauses] Spike: Bitch.

Sunday, February 12, 2012

"The Killer in Me"

Willow: "She says she wants you to meditate extra hard for her and bring her back some s'mores."

Giles: "Ah, yes, s'mores. I'm going to end up singing campfire songs, aren't I?"


S'more's Cupcakes!!!

Who doesn't love s'mores?  Well, maybe my husband who is allergic to chocolate, but not many others.  These tasty treats are delicious, especially just out of the oven.

Ingredients:
24 cupcake liners
24 Yellow cake cupcakes
Graham crackers, broken in to pieces
Chocolate baking chunks
24 Large Marshmallows
24 Honey Teddy Grahams
24 Hershey's bar pieces
Marshmallow creme

I looked at a couple of different recipes before I decided what to do here.  First, I wanted a graham cracker base, but not like a crust.  I broke up the crackers into chunks and placed them into the cupcake liners.  Next I made a layer using the chocolate baking chunks, and lastly place the marshmallow on top.  I really wanted to make it similarly constructed like a S'more. 

In the batter, I put more chocolate chunks and poured it around the marshmallow.  Bake as directed.  *Trial and Error* I knew the marshmallow would rise a bit, but I didn't expect it to completely collapse and leave a giant hole in my cupcake.  Luckily, I had planned to make a marshmallow creme frosting and instead, I just filled the hole with marshmallow creme.  Now, no frosting necessary.  Finish off with a Hershey's chocolate square and teddy graham.  Serve warm for chewy goodness.  Or cooled.  Either way, it's AMAZING. 

Be crafty,
Kris


"Intervention"

Buffybot (going out to patrol): "Time to slay. Vampires of the world beware!"

My best friend, Katherine, and I


Austin Comic Con!!


My costume of choice was Buffybot.  I love Buffy the Vampire Slayer, and even though she makes a brief appearance in the series, I love the Buffybot.  She really cracks me up.  Plus, this costume doesn't require any sewing.  Which, is good, considering I only recently acquired a sewing machine.


BuffyBot outfit w/first jacket
What I needed for a Buffybot:
Black "Leather" Jacket - preferably motorcycle style w/o too many pockets
Bright Pink Shirt - boatneck, very simple
Light Pink Skirt - knee length, accordion pleats
Black shoes - 90's style, low heel, heeled loafer
Pink heart pin - bejeweled
Bow bracelet - gold
Stake


I started my search in the summer when I zeroed in on a costume.  Finding a "leather" jacket in the summer in Texas is nearly impossible.  Thankfully, Burlington Coat Factory had a few.  I didn't want to drop a ton of $$ for the coat and the only one they had for less than $20 was a size too small.  Afraid that I wouldn't be able to find another that price, I bought it.  It zipped up, but the chest was SUPER tight and there was a strap across the neck that I wanted to remove.  When I put together the almost complete costume to show my husband, the jacket was SO HOT.  I didn't know how I would make it during the convention.  Luckily, I just happened to be perusing Burlington Coat Factory again in August and they had a much larger collection of "leather" jackets.  AND, I found one that was perfect!  It was even only $14, my size, no neck strap to remove, and a nice cool liner inside.  PERFECT.


The shirt turned out to be pretty easy to find.  I just googled 'pink boatneck shirt' and one popped up at Macy's (on sale) for less than $15.  It's a little more purple pink than I wanted but it still looks good.  It's also a little long, which is great for everyday wear, but I just folded it up a bit for a shorter look for the con.


The skirt.  Oh, the skirt.  Accordion skirts are not in style.  I only found ONE online, in the color I wanted, from a Korean company.  Sure, the skirt was only $15, but you had to pay $30 in shipping.  It was also ONESIZE, so no way to know for sure if it would fit me.  I'm a 14, by the way, so online shopping makes me nervous.  After a few more weeks of looking, I still couldn't find anything else, so I ordered it.  Three weeks later, I open the package and it's BLUE.  I argued with the company for a while, but they wouldn't exchange it or refund me.  Shoulda read that fine print a little closer.  One plus is that it did fit.  I'm just not sure when I'm going to wear it...  :(  So, then my mom and I started considering making the skirt ourselves.  She swears that skirts are EASY.  So we look at fabric, find a few possibilities, and then check out the patterns.  What did I say about accordion skirts?  Not. In. Style.  No patterns.  I couldn't even find any online.  And as 'easy' as a skirt is, my mom doesn't make her own pattern.  So I continued the search online.  AGAIN.  My mom sent me two links to skirts she happened to find, and one of them was perfect!  I don't know what we were googling differently (maybe I was being too specific "accordion pleated skirt"), but she found it!  She thought it might be too pricey, but it was $30.  After the difficulty in finding this skirt, I'll take it!


The shoes turned out to be easy.  I knew I could probably find them at DSW, though I was suddenly wishing I hadn't gotten rid of my chunky loafers from my days of high school.  My mom, however, just happened to have a pair that worked for me.  They had a silver buckle, but that's okay.  I'll take free.  *Note - Post con, the shoes were SO uncomfortable.  I got blisters.  Remind me to not borrow shoes unless they fit AND can last 8+ hours on a convention floor.


The heart pin I made myself.  If you notice during the part where Buffybot is "hunting" Spike in his crypt, there is a sparkly heart pin on the bottom left side of the shirt.  I found a heart shaped metal pendant at Michael's.  I covered one side with pink jewels and hot glued a pin backing to the other side.  DONE.


The bracelet also makes an appearance during the same scene as above.  It is a short glimpse of what looks like a bow bracelet on Buffybot's left arm as she tries to "stake" Spike.  The only one that looks even remotely similar is a Marc Jacob's bracelet.  No thank you.  I didn't think I could make it, so it did not make the costume.


The stake was easy peasy.  I had remembered seeing a seller on ebay for stakes so I looked it up.  They were only sellling one stake at the time (apparently from a different season than 5), but I went ahead and bought it.  Now, I haven't purchased off ebay since high school (10 years ago) so I couldn't remember anything about a login name or password and my email has changed since then.  So I created a new one.  The seller said they wouldn't sell to anyone with less than 10 positive review.  Instead of bidding and not getting it, I clicked 'buy it now' and payed a little more, but as least it was guaranteed.  This was the most expensive item at $50. 

The convention was so much fun!  Several people stopped me to say they loved my costume, even though the contest person had no idea who I was.  I even got a photo with James Marsters while wearing the outfit.  I was super nervous but the picture looks great!!


Be Crafty (and Nerdy),

Kris


Monday, February 6, 2012

"Real Me"

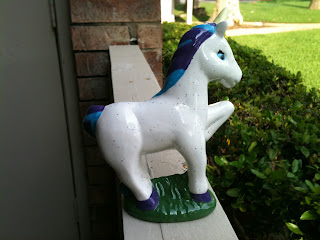
Harmony: Okay, hi. First of all, I wanna thank everybody for a really successful raid on the magic shop last night. [she applauds] Good job, minions! Yes, you deserve it. Secondly, somebody remembered to pick me up the sweetest little unicorn!


So yes, I did indeed paint a ceramic unicorn at my favorite DIY place just so a celebrity could sign it.  It was a lot of fun to make and Mercedes McNab was super nice.  She was a good sport about signing it, which is funny since she was asked during the panel if she collected anything like the vampire she played in Buffy, Harmony, did, to which she replied, "Shoes."  She went on to say that she actually smashed all the unicorns she could at the end.  :(  So I cautiously approached her and handed over my unicorn and asked politely to not break it.  She laughed.


This is just the beginning of my Austin Comic Con post(s).  Even though this was the only crafty thing I made for the event, the con includes aspects pretty important to the blog (the titles and all) and I LOVE Buffy and geeky stuff, so I just want to blog, at length, about it. 


Mercedes McNab (above) signing autographs.  Charisma Carpenter, M. McNab, and James Leary at the Buffy panel.

Be Crafty (and nerdy),
Kris


Sunday, January 22, 2012

"As You Were"

Anya: I can only do so much, Xander! Planning this Marriage is like staging the invasion of Normandy.


Xander: Without the laughs.


One of my best friends, Erin, is getting married! 

Knowing that I like to make signs for the newly married couple to hang, she asked if they were getting a sign(in her cute adorable way, so I couldn't get mad for spoiling my surprise). 

I knew that I had to do some thing amazing for her and John.  After a few different ideas, I finally settled on one.  In Erin's kitchen right now, she has three trivets that are super cute.  She told me that they were going to base their kitchen colors off of those.  Perfect!  I took a few pictures as a guide. 

She loves glass working and I'm always trying to challenge myself, so I decided on a glass fusion piece for their sign.  I went to my favorite little studio, Sunshine Glaze, and set out to learn this new crafting technique for myself. 


They have many different sizes of background glass pieces, but I went with the white round so it would look similar to the trivets I was basing this off of.  I also knew that I wanted to duplicate the colors. 

All in all, it wasn't too difficult to learn.  I can say, it's a good thing they give you protective glasses, because I'm pretty sure I would have gotten glass in my eye.  You just mark the glass pieces you want with one tool and break it with another.  I did notice the smaller piece you're trying to break, the more difficult it is and more likely that it's going to pop (and break randomly) everywhere. 

Place with glue and you're all set. 


Luckily, the studio I use fires everything for you so I had to do was pick it up!


I also know about a glass-blowing studio that is teaching Introductory glass fusion techniques and I would LOVE to be able to get into one of their classes.  It was a lot of fun and I think I'll be doing many more pieces like this.


Congratulations to my good friends, and I can't wait for the wedding in November!!

Before fusing the glass together
Be Crafty,

Kris

P.S.  I already gave it to them, so I'm not spoiling anything!